The Cinematography Of — Ampify “Uncovering Musical Creativity with Slugabed”

Last month, we teamed up with our pals at Focusrite/Novation to produce a commercial for Ampify, a music creativity platform housing popular apps like Blocs Wave, Groovebox and Launchpad.

To get the brand’s message across and give the ad a focal point of interest, we partnered up with bass-heavy, glitch-hop artist, Slugabed.
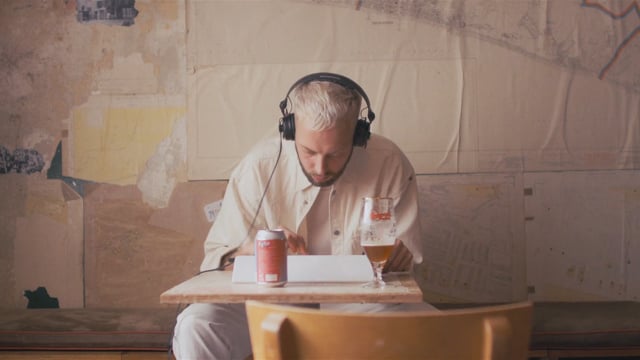
The shoot took place across a variety of locations within Brighton—the main lit scenes taking place at Slugabed’s house, Small Pond recording studios and The Marwood bar/cafe.
Usually in these breakdowns I like to waffle on about the deeper meanings behind the camera, lens and lighting choices, giving an insight into my own vision for the look of the film. I’m going to try something different this time.
Due to the documentary nature of the shoot, I wasn’t able to visit any of the locations prior to shooting, and was only given photographs on which to base my plans. Director Josh Bennett and myself sat down and discussed a general mood and vibe for the film, as well as discussing the methodology behind certain shots we wanted to achieve. I packed a kit based on what I thought would do the job, knowing that I’d have to roll with the punches.
Here’s a breakdown of the final lit scenes. Buckle up.
1. Small Pond Studio
Dimmers. Dimmers everywhere.

We really liked the dark moodiness to this room. There were dimmable lights in the ceiling, which was a lucky place to start. I adjusted those to taste, knowing that although I wanted to keep the room dark, I wanted to hold some of the shadow details and be able to make a final decision in the grade.
There was already one lamp in the room (frame right) and I’d brought along another. I knew there were going to be some side-on close-ups of the desk and Greg (Slugabed) and so I placed the lamps in such a way that there would be a key and backlight from most angles.
If there’s one thing I hate seeing in productions like this, it’s blown out lamps—it just kills the value for me. Putting both of the practical lamps through dimmers (from Amazon, click here) allowed me to dial them down, ensuring a softer glow and squeezing as much detail into the latitude of the camera’s sensor as possible. I also liked how the warmth of the lamps contrasted with the blue walls, the sound racking and Greg’s blue jacket. Sometimes you just get lucky.


2. Greg’s House (Daytime Interior)
When I got into Greg’s house, I found that he had his home studio set up in the corner of a room, with a bay window next to it (frame left). Although it wasn’t in the best place to work with (shooting next to flat, white walls can make your images a bit, well, flat) it did look visually interesting, and so after considering our time restraints, this being scene 1-of-2 in location 1-of-3 for the day, I decided to try and reinforce the available light and make the best of the situation.

The window being where it was, at 9am, was kicking a lot of light towards the camera, heavily backlighting Greg and blowing out. I wanted to provide Greg with a bit more light on the key side, which would in turn allow me to retain some of the detail in the window.
I set up a 2 x 1 LED Panel to the left of frame with a honeycomb and set it to 5600K. I eased the intensity up until I found a happy medium between making Greg look ‘lit’ which I didn’t want, and saving the detail in the window. The shadows from the mini palm tree help break the wall up, as do the bits of kit on that side. In Resolve, I was able to power mask the window and bring it back even further.
3.Greg’s House (Night Interior)
So, we’d just finished shooting the daytime home studio scene, and I had about 20 minutes to set up a day-for-night scene in the same room. No pressure.

First things first, I needed to see how dark I could get the room. I shut all of the french blinds and doors and turned off all the light sources in the room. I then introduced my key light, which in this scene was a skirted LED panel set to 2700K for a slightly warm look. I positioned it as high in the room as I could, off to the right of frame, almost directly above Greg, so that it emulated a diffused ceiling lamp.
At this point I had my subject lit, but it didn’t feel overly ‘night time’. To accentuate the evening vibe, I opened one of the blinds, letting some natural light in. I then piled on a tonne of ND to cut the light down, leaving it looking pretty dim and blue, softly filling the space behind Greg. I brought up the key to compensate and get the balance. Lastly, I felt like the scene was missing a bit of depth, so we positioned a plant and a dimmed lamp on a small table behind Greg. Boom.


Match Cuts
The main device in this promo in terms of transitions was match-cutting. We used them throughout the film to jump between scenes and to draw parallels between analogue and digital technology.


We didn’t have Cinetape or any clever reference monitor overlaying the previous frame, so here’s the deal. We planned each transition and decided on the framing and focal length prior to shooting. I then used a tape measure to measure the distances from the talent to to the camera on location. It really was that simple! Sometimes the easy methods are the most effective.
Although it is definitely not my preferred method of working—being such a stickler for creating and sticking to pre-conceived plans and ideas—lighting on the run was undoubtedly a good learning experience for me. I think in those situations the most important questions to ask yourself are:
Can I make this scene look good in the current way that it’s arranged, and if not, what is the most effective and efficient way of changing the space? ie. moving furniture, adding a light etc
Do I have the ability to block out the main source of natural light / Can I control the main source of light in this room? If not, how can I best arrange my composition and work around it to achieve the best results?
For me, it seemed like the sooner I could let go of the stress related to my lack of control in a location, the sooner I was able to work in a more fluid and malleable manner.