The Cinematography of — Nineteen Fifty Eight “Dark Blue”

It’s no secret that I’ve had a fascination with achieving beautiful, soft-looking skin for a while now.
Not personally of course, it’s unlikely that you’ll catch me with a mud mask on any time soon — I meant in my films!
Through my experiences over the last 5 years of shooting, lighting and generally experimenting with different ideas, I’ve accumulated a list of factors that contribute to creating skin so soft it would make a feather jealous:
- High-key Lighting
- Diffusion
- Cinematic camera sensors (the bigger the better!)
- Lens choice
- Filter glass
Back in February, I was presented with the opportunity to exercise the use of all of these factors in one music video for the Swansea-based alt-emo band, Nineteen Fifty Eight.
Director Ben Curd approached me with the idea of creating a lifted, flat, soft look and feel for the performance-led promo. The shoot posed several challenges and presented me with the opportunity to try out a number of ideas I’d been keeping on the back burner. Buckle up for a breakdown…
Lighting
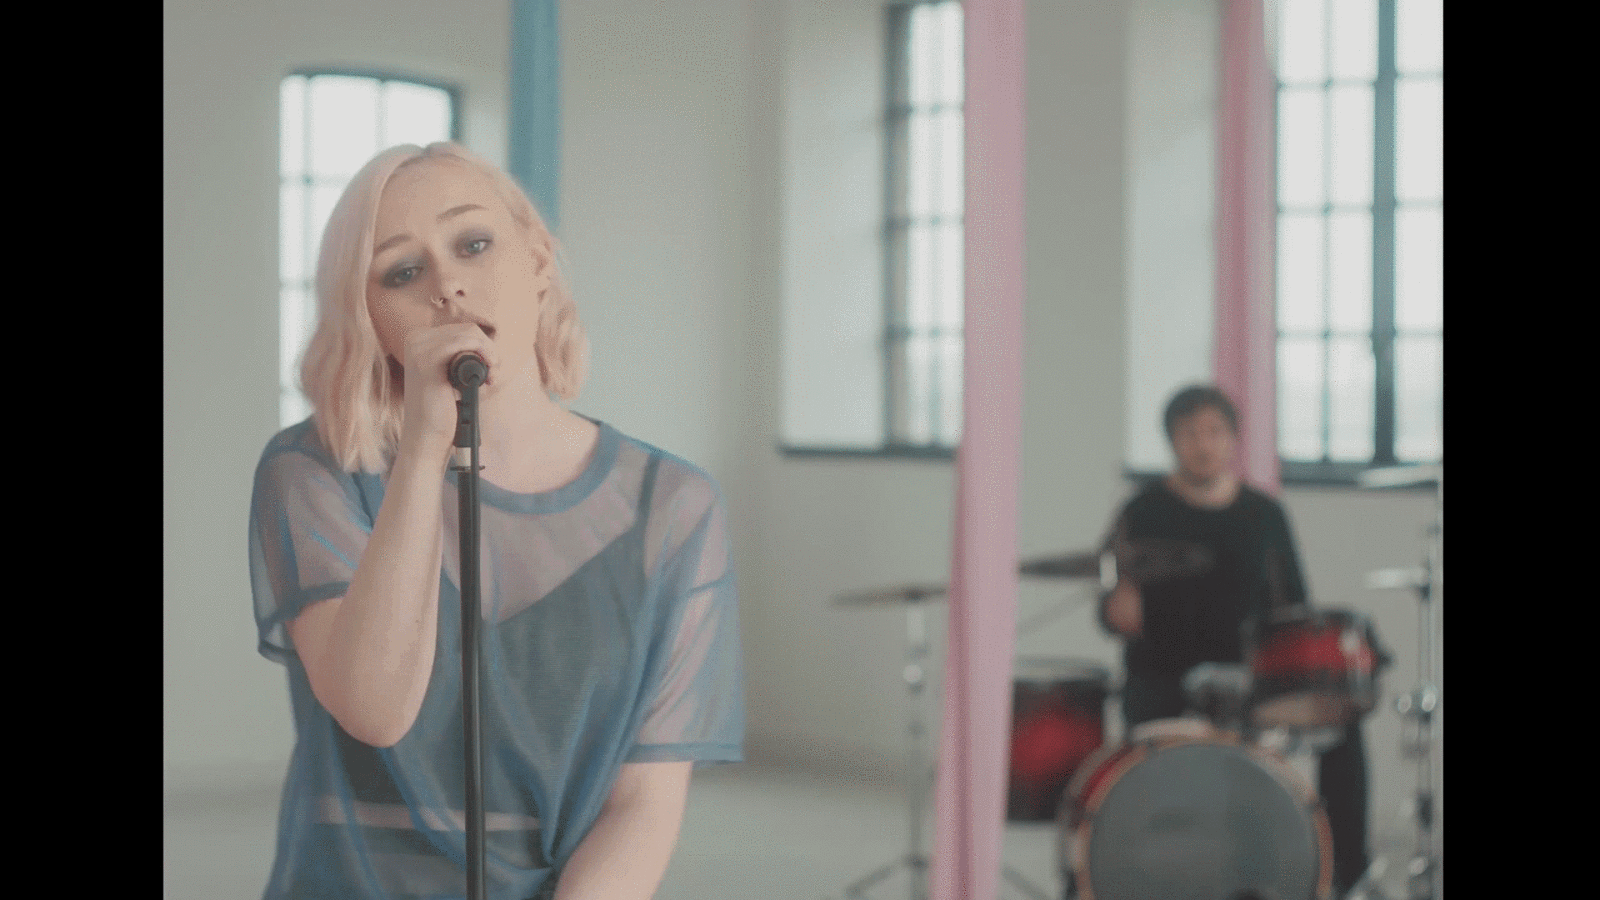
The first thing that I said to Ben when he mentioned that we’d be shooting the video in a big, white empty building was “You’re going to want a full-band wide of this, aren’t you?”
He did.
The main issue with this was that while it’s pretty easy to light an individual person in a high-key manner without seeing any lights in shot, lighting five people in a big room at the same time is a bit more of a headache.
A few weeks prior to this job I had been reading about book lights and how they can be used to light a full-body shot in a diffused style. This got me thinking: Surely if you can light an area the size of person with a book light, all you have to do to light a bigger area is make a bigger book light, right?
I got on the phone to my main man Julian at Video Europe to discuss my idea, and after his usual reaction of “You want to do WHAT?” we concluded that three 1800W HMIs shooting into an 8x8ft Ultrabounce and then filtering through a 12x12ft quarter silk frame should do the trick.
When working with filter glass, it seems to be a case of the more light you smash into your subject, the more profound the effect of the filter. It was therefore very important to me that we used enough light to really get the benefit of the filters.

Camera & Lens
I’m afraid that, in terms of the camera, there’s not too much to talk about this time. Soz. The trusty Sony FS700 and Odyssey 7Q+ had our backs yet again. We did however decide to shoot in 4K RAW, which was unusual for us.
This decision came from wanting to have plenty of control over the image in post—specifically the skin tones, walls and windows in the background (I’ll touch upon this more in the post workflow section). RAW is great, but filling up a 512GB SSD in 24 minutes wasn’t ideal.
In terms of lenses, we shot most of the video on a 1970s Russian Helios 58mm. Being so old and lacking in modern coatings, this lens does a great job of diffusing light anyway, and 58mm on a super-35 sensor works really nicely as a portraiture focal length. The only other lens we used was a Samyang 24mm Cine Prime for the wide.
We shot with our desired finishing LUT on the monitor, which really helped to give us a good idea of what the final film would look like, as well as acting as another tool to tell me I was exposing correctly for the style of the film, which can usually be tricky if you’re just looking at a linear colour RAW image.

Filter Glass
The last avenue that I had to explore before I completed my quest for soft skin was filter glass. This was a bit of an enigma to me until I went to BSC last year. I’d been aware of ND filters, polarisers, and even some wackier stuff that my Grandad used to use in wedding portraits in the 70s, but I didn’t realise that filter glass was still relevant and powerful today!
After picking up a sample pack of filters from the Tiffen stand at BSC, I shot a series of tests with a variety of skin-softening filters to see which ones might be suitable for this project.
After reviewing the test footage, I decided that ‘Pearlescent’ would be most suitable for this shoot, as I was actually looking to lift the blacks—something that the ‘Black’ range of filters were designed to avoid.
After the cut was signed off, we did an XML export and made a trip to DaVinci Resolve where we were able to make the most of the RAW data. It was a bit of a relief that, after applying the S-log2 gamut settings, using the correct colour space for the timeline and then applying our chosen LUT, we could see that I’d nailed the exposure. Throughout the edit we were looking at a relatively dark, contrasty, saturated image—so it was nice to put everyone’s minds at ease.
To be honest, I was pretty surprised at just how good the results were. Seeing the lead singer’s face on a big monitor for the first time shed a light on (no pun intended) the full effectiveness of the lighting, camera and filter choices I had made.

That’s it for another instalment of Cinematography Breakdown, as always, if there’s anything I can improve, do differently or add more or less detail to, get in touch! I love talking about this stuff.

